Originally published by Sunil Paul Mathew on February 1, 2021 | Updated by the Arenaoftech Editorial Team on March 10, 2026
Editorial Note: This classic guide was originally authored by Sunil Paul Mathew, a long-time contributor to the Android community who currently serves as a Scientist at German Environment Agency. While the Android ecosystem has evolved with the introduction of Zygisk and Kernel-level rooting solutions, the core architecture of Magisk modules remains the industry standard for system-less modification. The following guide has been refined for 2026 to reflect current naming conventions and the shift toward decentralized module distribution.
Magisk, a suite of open-source tools for customizing Android, is considered by many enthusiasts as the most complete and feature-rich rooting solution for Android devices. With millions of total downloads and still counting from its official release page, Magisk remains miles ahead of other rooting solutions available in the market. This number continues to grow as the project adapts to the increasingly stringent security protocols of modern Android versions.

Learn to build a custom Magisk module from scratch on Android.
Magisk Modules
Other than providing a free, open-source, and extremely powerful rooting solution, a Magisk installation also comes with a feature-complete BusyBox binary (a software suite that provides several Unix utilities as a single executable file) as well as a highly versatile module concept. The advantages of Magisk and its system-less behavior—allowing for modifications without altering the /system partition—are essential for passing modern integrity checks.
Despite a common misconception that module development is overly complex, setting up a module for basic tasks is straightforward. This article focuses on teaching readers how to manually create their first Magisk module locally within a mobile device.
Magisk modules allow one to easily modify otherwise “read-only” partitions, such as /system or /vendor. Thanks to the continued efforts of the Magisk development team, a root user can achieve this without immense manual effort by following a few simple steps.
Creating a Module
Technically, Magisk modules are folders bearing certain structures placed inside the Magisk module path (/data/adb/modules). The Magisk app (formerly known as Magisk Manager) considers each folder found inside this path (represented as MODPATH) as a module, provided it satisfies specific conditions.
The most critical requirement is the existence of MODPATH/module.prop with the following contents:
-
“id” – A string matching the regular expression
^[a-zA-Z][a-zA-Z0-9._-]+$. This is the unique identifier of your module. It is highly advisable to keep this ID identical to the folder name in/data/adb/modules. -
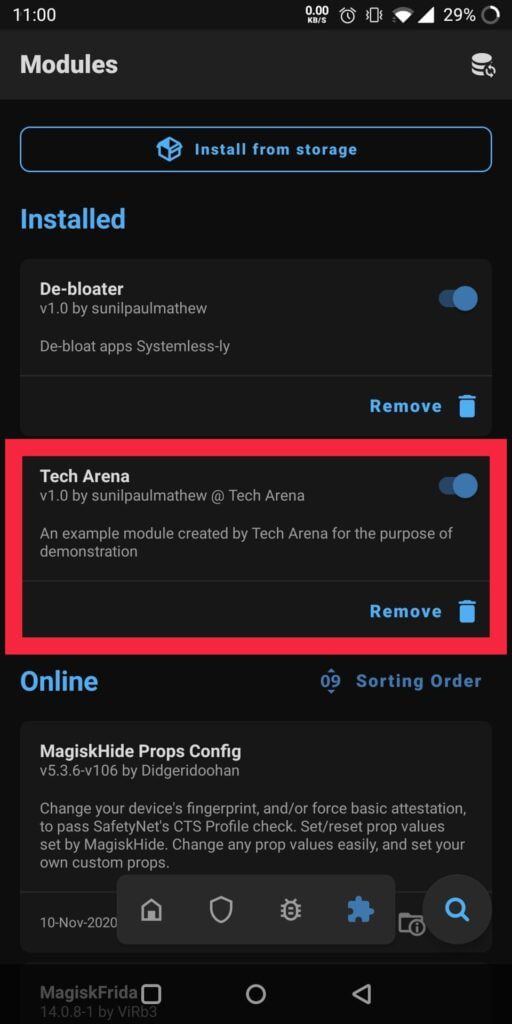
“name” – The display name of the module, which will appear in the “Modules” section of the Magisk app.
-
“version” – A string representing the version name (e.g., v1.0).
-
“versionCode” – An integer used by the app to determine update status.
-
“author” – The name of the developer or company.
-
“description” – A short, single-line summary of the module’s function.
Practical Example:
Plaintext
id=TechArena
name=Tech Arena
version=v1.0
versionCode=1
author=sunilpaulmathew @ Tech Arena
description=An example module created by Tech Arena for the purpose of demonstration
Upon placing a module.prop file with the above content inside /data/adb/modules/TechArena, the Magisk app will recognize and display the new module.
Use of Modules?
What can a Magisk module actually achieve? For an advanced user with deep knowledge of the Android ecosystem or the Unix command line, the possibilities are vast. Because it operates system-lessly, you can:
-
Debloat System Apps: Remove unwanted pre-installed software by placing a dummy file or folder in a system-less manner.
-
Manipulate system.prop: Override values in the device’s
build.propby creatingMODPATH/system.prop. -
Execute Boot Scripts: Run shell commands during device startup, either in an early stage (post-fs-data mode) or a later stage (late_start service mode), by placing a
post-fs-data.shorservice.shinside the MODPATH.
The official developer guide provided by the Magisk team offers an exhaustive list of capabilities. While creating an installable .zip for distribution requires additional steps (such as including an update-binary and updater-script), the fundamental logic remains the same.
For the most current technical documentation, users are encouraged to visit the official Magisk Developer Guide. Follow ARENAOFTECH for more.